Are you a team member in a veterinary practice?
Are you a pet parent planning a trip with your furry pal?
European Union Pet Health Certificate Form Guide
You've booked the flight, found a carrier your pet tolerates, and then discovered that the European Union pet health certificate form is not just a note from your veterinarian. It's a controlled veterinary document connected to your pet's identity, rabies records, laboratory information, treatments, official endorsement, and border checks.
The good news is that the form becomes much less intimidating when you treat it like a quick-lookup reference rather than a mystery document. The guide below shows where each group of fields belongs, how a completed entry might look, which dates deserve a second glance, and how the owner, veterinarian, and competent authority fit into one workflow. Keep it nearby while you prepare, and let your paperwork journey be more “smooth sailing” than “ruff crossing.”
Introduction to the European Union Pet Health Certificate Form
Suppose Maya is flying from a non-EU country to France with her cat, Juniper. Juniper has a microchip and a rabies vaccination, so Maya expects the final step to be a quick clinic visit. Instead, her veterinarian asks for the destination, travel date, identification record, vaccination details, and the correct certificate version. Suddenly, the form looks less like a simple appointment handout and more like a small travel dossier.
That reaction is normal. The European Commission says a pet entering the EU from a non-EU country must carry an animal health certificate. The certificate applies in practical terms to dogs, cats, and ferrets, while other animals follow separate country rules, as explained by the EU's official guidance on pets and other animals.
What the certificate is checking
The document connects several facts that must describe the same animal:
Identity: The microchip or tattoo code identifies the pet being presented.
Rabies control: The certificate records vaccination details.
Laboratory information: Where relevant, it records blood sampling details.
Treatment information: Where relevant, it records tapeworm treatment details.
Official responsibility: An official or authorised veterinarian completes the document, with competent-authority endorsement where required.
That connection explains why a tiny transcription error can matter. A vaccination entry that doesn't match the animal's identification record creates a question at the exact point where officials are checking identity and health documentation.
How to use this guide
You don't need to read every line in order. Use the sections as a reference:
Check version timing before downloading or completing anything.
Use the structure map when you're unsure where a detail belongs.
Copy the style of the sample entries for identification, vaccination, laboratory, and treatment fields.
Review the error comparison before the veterinarian signs or endorses the form.
Follow the validation workflow when several people or authorities are involved.
The certificate has a narrow operational window. The European Commission states that it's valid for 10 days from the date of issue until documentary and identity checks at the EU entry point. For a sea journey, that period extends by the duration of the sea voyage. After those checks, the same certificate remains valid for onward movement within the EU for 6 months from the date of the checks or until the anti-rabies vaccination expires, whichever comes first. See the Commission's rules for bringing dogs, cats, and ferrets into the EU before fixing your appointment.
Where to Find the Official Form and Which Version to Use
Start with the authority responsible for your route, not a random downloadable template. Government websites and competent veterinary authorities are the safest places to confirm the current model, language, endorsement requirements, and transition rules. A search result can lead to an old file that looks perfectly respectable, which is precisely why form versioning deserves its own checklist.

Confirm the model before filling it in
Use this sequence:
Identify the movement type. Confirm that the trip is non-commercial and that the document applies to your pet's situation. Commercial and non-commercial movements can follow different requirements, so don't assume a form used for one purpose fits the other.
Check the departure country. Origin-market authorities may publish their own instructions, endorsement routes, or cutoffs for older models.
Compare the travel milestones. Record the certificate issue date, planned departure, EU entry inspection, and any onward movement. The issue date and the inspection date aren't interchangeable.
Review transition notices. The European Commission has announced that new animal health certificate models are mandatory from 1 October 2026, while different origin countries may use different phase-in windows and endorsement cutoffs. The Commission's 2026 notice on new pet-travel rules is useful for spotting these changes.
Ask the issuing veterinarian to verify the file. A veterinarian or authority can confirm whether the chosen model matches the departure date and destination inspection date.
Inspect the document format
The EU framework has strict presentation controls. The original must be a single sheet, or an indivisible set of pages when extra space is needed. It must appear in at least one official language of the EU member state of entry and in English.
Before signing, check that:
Entries use block letters.
Every page is numbered if the certificate has multiple pages.
Each page carries the certificate reference number assigned by the competent authority.
The certificate is issued by an official veterinarian, or by an authorised veterinarian and then endorsed by the competent authority.
The issuance date and form model are visible and consistent.
The framework linked to Regulation 576/2013 and its certificate format controls has applied since 29 December 2014, so this isn't an improvised travel note. In 2026, legacy certificates remain acceptable only for a limited transition period, with older certificates accepted for EU imports if issued before 17 October 2026, according to the same regulatory reference. Treat the issue date as a version checkpoint, not a decorative date.
For broader preparation, keep your certificate review alongside the international pet documentation requirements. One tidy folder can save a surprising amount of tail chasing later.
How the Certificate Is Organized and What Each Part Covers
A useful way to read the form is as a chain. The owner identifies the person responsible for the movement. The animal section identifies the pet. The clinical and laboratory fields explain health status and disease-control steps. The official section confirms who completed, checked, and endorsed the document.
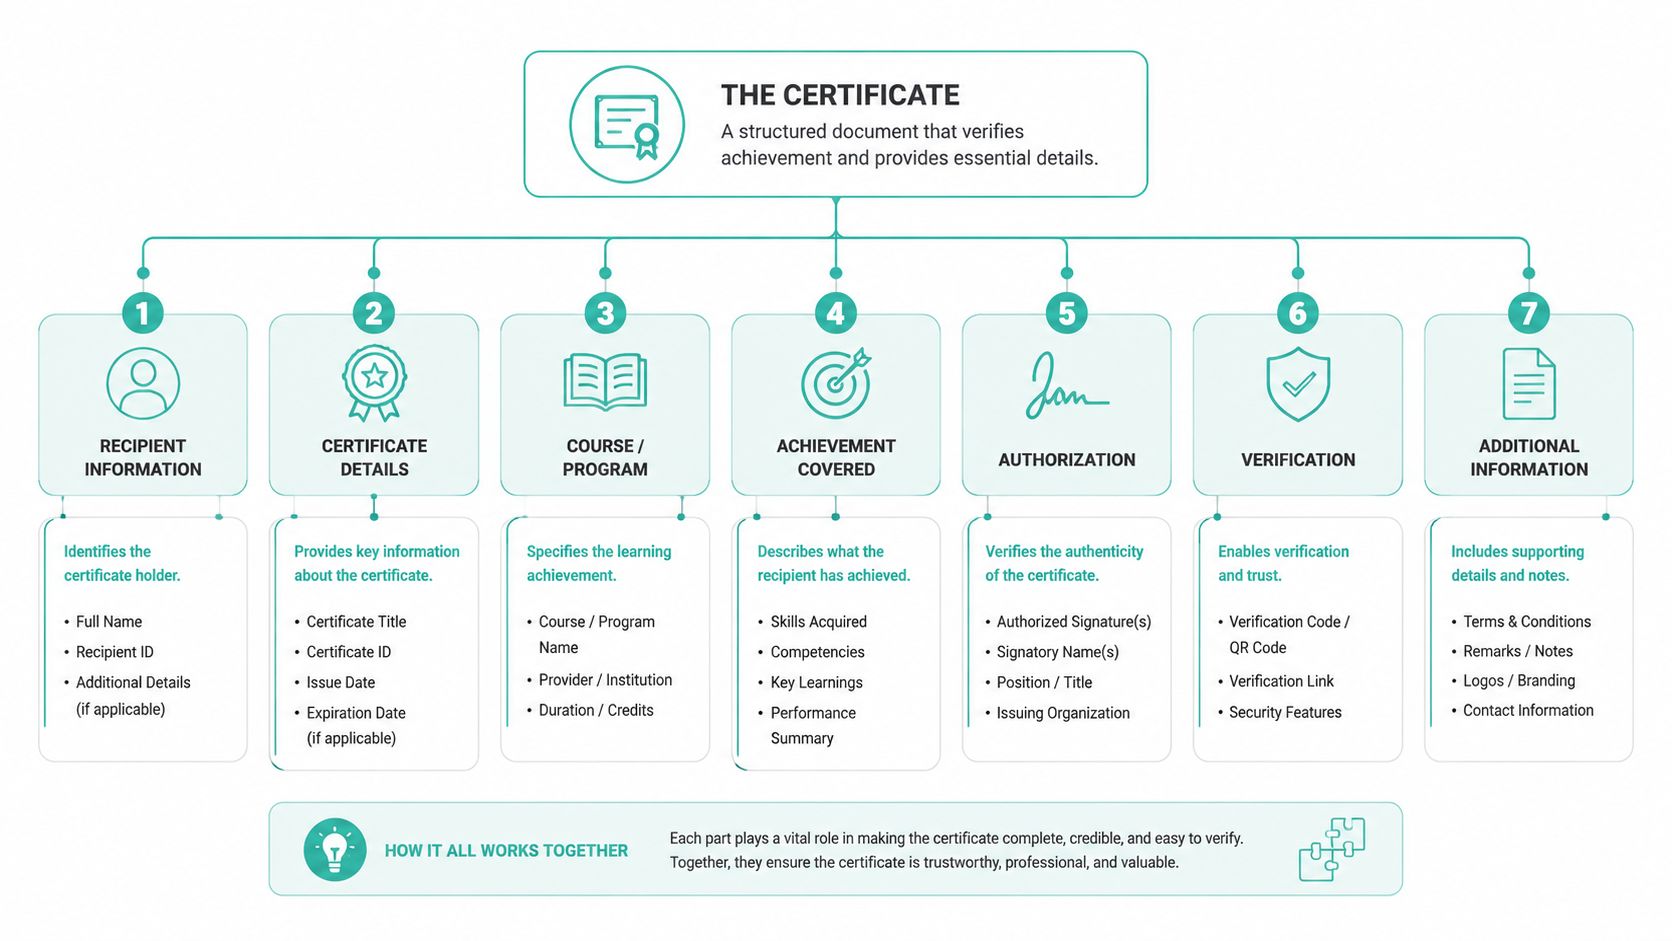
The four practical field groups
Owner and movement details sit near the front of the logic. These fields identify the person responsible for the pet and describe the movement. Use the owner's current contact details and keep the destination consistent across the application, appointment request, and travel record.
Animal identification follows. The form records species, physical description, and the microchip or tattoo code. The code is the anchor for the rest of the document. If the code is copied incorrectly, later vaccination and laboratory entries can no longer be confidently tied to the right animal.
Vaccination, laboratory, and treatment information provides the clinical evidence. Rabies details belong here, along with blood sampling information and tapeworm treatment details where relevant. These entries may be completed from veterinary records, so bring the original information rather than relying on memory.
Certification and validity completes the chain. The veterinarian's declaration, authority endorsement, dates, signatures, page numbering, and reference number show that the document was prepared through the required official process.
Why the categories connect
Think of the form as a set of linked keys:
The microchip or tattoo code links the pet to the clinical record.
The rabies entry links the vaccination to that identified pet.
The laboratory entry links blood sampling to the relevant animal and certificate.
The authority details link the completed form to the official validation process.
The dates link the document to the intended inspection and onward travel.
When you need a more detailed companion reference, the international pet health certificate guide can sit beside this category map. Use the overview when you're locating a field, then move to the field-level examples below when you're ready to enter or check the information.
Owner and Pet Identification Fields Explained With Examples
Identification fields look simple because most ask for familiar information. They still deserve careful attention, since every later clinical entry must describe the same pet. Write in block letters, copy codes character by character, and use the animal's official records as your source.

Owner and movement information
The owner section should let an authority understand who is responsible for the animal and where the pet is going. Use the name exactly as it appears on the travel and veterinary records, then provide a complete address, telephone number, and email address where the form requests them.
Example
Owner name: MAYA RIVERA
Address: 18 OAK STREET, BOSTON, MA, USA
Destination: 12 RUE DES LILAS, LYON, FRANCE
Contact: +1 000 000 0000, MAYA.RIVERA@EXAMPLE.COM
This is a formatting example, not a substitute for Maya's real details. The important habit is consistency. If one document says “Maya Rivera” and another uses a different owner or destination format, ask the veterinarian which version should appear throughout the travel file.
Animal description
The form's animal fields normally identify the species and provide a practical description. For a dog, record the species as DOG, then use the breed, sex, date of birth or age where requested, coat colour, and distinguishing marks. For a cat or ferret, use the corresponding species and describe the animal plainly.
Example
Field | Sample entry |
|---|---|
Species | CAT |
Name | JUNIPER |
Sex | FEMALE |
Breed | DOMESTIC SHORT HAIR |
Colour | GREY AND WHITE |
Age | Use the veterinary record |
Avoid playful nicknames in formal fields unless they're the pet's recorded name. “Juniper” is helpful if that's the name used by the owner and clinic. “The Fluffster” may earn a smile, but it won't improve identity verification.
Microchip or tattoo code
Copy the microchip or tattoo code directly from the veterinary record and have the veterinarian scan the pet before finalising the certificate. Don't retype the number from memory. Check every character, especially zeros, letters, and repeated digits.
Practical rule: The identification code is the form's anchor. Check it against the scan, the vaccination record, and every page before endorsement.
The EU pet passport system is limited to dogs, cats, and ferrets, and it's issued only to owners who reside in the EU. Birds, reptiles, rodents, rabbits, and ornamental aquatic animals follow separate country rules, so don't force another species into a dog, cat, or ferret template. For microchip background and practical checks, see the ISO-compliant microchips guide.
Vaccination Laboratory and Treatment Fields Explained With Examples
Clinical fields answer a different question from the identity section. They show what happened medically, when it happened, and which animal received the procedure. Use the veterinarian's records for every entry, and ask the clinic to confirm any unclear date, product, batch, or laboratory detail before the document is endorsed.

Rabies vaccination details
The certificate must document rabies vaccination information. Depending on the form fields, that can include the vaccine name, manufacturer, batch or lot number, administration date, validity period, and the veterinarian's details.
Example
Vaccine: Use the product name from the medical record.
Manufacturer: Copy the recorded manufacturer.
Batch or lot: Copy the exact code.
Date given: Use the veterinary record's date format.
Valid until: Use the product and clinical record information.
The rabies entry must connect to the identified pet. That's why the veterinarian should confirm the microchip or tattoo code before completing this part, rather than treating vaccination information as a standalone note.
Blood sampling information
Where required or relevant, the certificate documents blood sampling details. This may include the sample date, laboratory information, and result information. Don't guess at a result or compress a laboratory name into an informal abbreviation if the form asks for the official wording.
Example
Field | Sample approach |
|---|---|
Sample date | Copy the laboratory record |
Laboratory | Use the recorded laboratory name |
Result | Copy the official result |
Animal identifier | Match the certificate code exactly |
Tapeworm treatment where relevant
The Commission's certificate requirements include tapeworm treatment details where relevant. This field isn't a general invitation to add every medication your pet has ever received. Use it for the treatment information required for the destination and movement, and ask the veterinarian to determine what belongs on the certificate.
Pet owners who need help understanding medication records can review puppy dewormer prescription rules, especially when a young animal's treatment history is being gathered for a travel appointment. The prescribing veterinarian remains the right person to confirm what treatment was given and what the certificate should record.
Keep the clinical trail consistent
A clean entry uses the same animal identifier, date, and official record throughout the certificate. If the form spans several pages, check that the certificate reference number and page numbering stay consistent. A tidy clinical record gives the official veterinarian or competent authority a clear trail to review.
Common Errors to Avoid When Completing the Form
Most form problems are ordinary mistakes made under travel pressure. A missed page number, an unclear date, or a certificate issued outside the correct window can turn a calm departure into a very long conversation at the airport.
Use the following comparisons as a final proofreading tool. The “incorrect” examples are patterns to avoid, not invitations to panic.
Correct and incorrect entries side by side
Checkpoint | Correct approach | Incorrect approach |
|---|---|---|
Writing style | BLOCK LETTERS that are easy to read | Mixed handwriting that could be read several ways |
Page control | Pages numbered and marked with the certificate reference number | Extra pages added without numbering or reference details |
Languages | Entry language plus English as required | A completed form in an unapproved language combination |
Identification | Microchip or tattoo code copied from the scan and record | Code retyped from memory |
Dates | Issue, vaccination, sampling, and treatment dates copied from official records | Dates estimated or written in an unclear format |
Validity | Entry planned within the certificate's permitted window | Entry date calculated from departure when the rule concerns EU checks |
The timing trap
The European Commission says the certificate is valid for 10 days from issue until documentary and identity checks at the EU entry point, with a sea-voyage extension for journeys by sea. For onward movement within the EU, it remains valid for 6 months from the date of the checks or until the anti-rabies vaccination expires, whichever comes first. Those clocks serve different parts of the journey, so write the relevant milestone beside each date while planning.
A simple date worksheet can help:
Certificate issue date: Copy it from the signed document.
Planned EU entry inspection: Confirm the route and entry point.
Sea voyage: Note whether the journey is by sea.
Onward movement: Record the date of the checks and the rabies expiry date.
Final review: Ask the veterinarian or authority to confirm the calculation.
A last check before endorsement
Look at the complete document as an inspector might. Can the official identify the owner, the animal, the microchip or tattoo, the rabies record, any relevant laboratory or treatment details, and the authority trail without guessing?
If not, pause before signing. Fixing a blank or mismatch while the clinic has the records is much easier than explaining it after the document has entered the travel chain.
Veterinarian Responsibilities and the Validation Workflow
The certificate works because several people perform different tasks. The owner supplies accurate travel and contact information. The veterinarian examines the pet and completes the clinical and identification fields. The competent authority provides the official endorsement or oversight required for the movement.
The European framework allows the certificate to be issued by an official veterinarian, or by an authorised veterinarian followed by endorsement from the competent authority. That distinction matters because the clinic may prepare the document while a government authority completes the official validation step.
A practical workflow
First, collect the source records. The owner gives the clinic the destination, travel plan, owner details, microchip or tattoo information, rabies record, and any laboratory or treatment documents. The veterinarian compares these records rather than relying on a verbal summary.
Next, verify the animal. The veterinarian checks the pet's identity against the microchip or tattoo code and confirms that the clinical entries belong to that animal. A scan and a record review prevent many avoidable mismatches.
Then, complete the certificate. The veterinarian enters the information in the required format, including block-letter entries, page controls, reference information, and relevant clinical details. If more information is needed, the clinic should resolve it before the final signature.
After that, obtain endorsement. Where the process requires competent-authority endorsement, the certificate moves from the authorised veterinarian to that authority. The owner and clinic should agree who sends it, who monitors the status, and how the final endorsed document returns to the owner.
Finally, prepare for entry checks. The owner carries the original certificate and keeps the travel details aligned with the document. At the EU entry point, officials perform documentary and identity checks, so the pet and paperwork should be ready to connect clearly.
Why date changes need quick action
A shifted flight can affect the certificate's entry window, the appointment date, and the authority review. The European Commission's timing rules create a narrow operational window, particularly when the travel date moves close to departure. Owners should tell the clinic promptly rather than working from an outdated itinerary.
Veterinary practices can use a written checklist, shared task board, or document workflow platform to show which items are waiting for the owner, veterinarian, or authority. A tool such as Passpaw's certification workflow for veterinarians can help organise document tasks and client communication. It doesn't replace professional judgment or competent-authority endorsement, but it can make ownership of the next step clearer.
The smoothest workflow is not the fastest one. It's the one where every person knows what must happen next and which date controls the handoff.
Quick Reference Cross References and Related Resources
Keep this section open while you're checking the finished document. It's designed for the familiar travel-prep moment when someone asks, “Which box was that again?” and the dog has already decided the paperwork is a chew toy.
Quick Lookup for Common Certificate Questions
Question | Certificate Area | Where to Look |
|---|---|---|
Does this form apply to my pet? | Species and movement scope | Introduction, then owner and pet identification |
Where do I confirm the current model? | Version and transition timing | Where to find the official form |
What belongs in the identity fields? | Owner, species, description, code | Owner and pet identification |
Where do rabies details go? | Vaccination records | Vaccination, laboratory, and treatment fields |
What about blood sampling? | Laboratory information | Vaccination, laboratory, and treatment fields |
When does the entry window begin? | Certificate validity | Common errors and timing |
Who signs or endorses the document? | Official workflow | Veterinarian responsibilities |
Why do multiple pages need controls? | Page numbering and reference number | Official form and common errors |
Small glossary for quick checks
Animal health certificate: The official veterinary document used for the covered movement into the EU.
Competent authority: The government authority responsible for the relevant official validation or endorsement.
Microchip or tattoo code: The identifying code recorded for the animal.
Documentary and identity checks: The EU entry-point checks that connect the certificate to the pet and travel.
Onward movement: Travel within the EU after the entry checks.
Transition period: A limited window in which an older certificate model may still be accepted.
Sample snippets at a glance
Identity: SPECIES: CAT | NAME: JUNIPER | CODE: COPY FROM SCAN
Rabies: VACCINE DETAILS: COPY FROM VETERINARY RECORD
Laboratory: SAMPLE DATE: COPY FROM LABORATORY RECORD | RESULT: OFFICIAL WORDING
Page control: PAGE NUMBER: [CURRENT PAGE] | CERTIFICATE REFERENCE: [ASSIGNED NUMBER]
Use the source links in the earlier sections for official rules, then ask the issuing veterinarian or competent authority about anything specific to your origin country, destination, movement type, or travel date. A few minutes spent matching the form, records, and dates can keep the final preparation pleasantly boring, which is exactly what you want from pet-travel paperwork.
If you're preparing EU pet documents for a client or your own animal, Passpaw offers tools for organising international health-certificate tasks, document validation, travel-date priorities, and client communication. Visit Passpaw to keep the certificate workflow visible from the first record check through the final authority step.

More articles
From regulatory changes to best practices for veterinarians and pet owners, our resources keep you ahead of the curve.